What Are The Best Sizes for Your Wildlife Photos on SOcial Media
What Are The Best Image Sizes for Wildlife Images on The Different social Media Platforms
Let’s have a look at the world of social media. I want to make sure you have a better idea of the optimal size of images you should be uploading for each of the most popular platforms.
The Optimal size for social media platforms will change from time to time. It’s best to do some research prior to posting photos on social media platforms. At the moment, these are the optimal photo sizes listed, by the platform.
PROFILE PHOTO
Must be at least 180 x 180 pixels.
The photo will appear on the page as 170 x 170 pixels on desktop, 128 x 128 on smartphones, and 36 x 36 on most feature phones.
File Type: JPG and PNG
Business Page Profile Photo
Must be at least 180 x 180 pixels.
The photo will appear on the page as 170 x 170 pixels on desktop, 128 x 128 on smartphones, and 36 x 36 on most feature phones.
Photo thumbnails will appear throughout Facebook at 32 x 32 pixels.
Business Page images will be cropped to fit a square.
File Type: JPG and PNG
COVER PHOTO
Appear on page at 820 x 312 pixels. Anything less will be stretched.
The minimum size of 400 x 150 pixels.
Displays at 820 x 312 pixels on a desktop and 640 x 360 pixels on smartphones.
It doesn’t display on feature phones.
For best results, upload an sRGB JPG file less than 100 KB.
Images with a logo or text may be best as a PNG file.
Business Page dimensions are exactly the same as personal accounts.
File Type: JPG and PNG
TIMELINE PHOTOS SIZE
All aspects: 2048 pixels (width)
Landscape: 2048 x 1149 pixels
Portrait: 2048 x 3072 pixels
Square: 2048 x 2048 pixels
File Type: JPG and PNG
Facebook Stories
1080 x 1920 pixels (but keep your text within 1080 x 1420)
Tweets that include images consistently get more click-throughs, more likes, and more retweets than non-image tweets. So it pays to get images right on Twitter. If you’re unsure which image dimensions to use, stick to the recommended sizes below:
TWITTER PROFILE PHOTO SIZE
Recommended image size: 400 by 400 pixels
Minimum image size: 200 by 200 pixels
File Type: JPG and PNG
TWITTER HEADER IMAGE SIZE
1500 x 500 pixels
Recommended image formats are JPG and PNG
TWITTER IN-STREAM IMAGE SIZE
1024 x 512 pixels (recommended)
Minimum size: 440 x 220 pixels
Recommended aspect ratio: 16:9
File Type: .GIF, .JPG, .PNG
Maximum file size: 3 MB for photos, 5 MB for animated gifs
Instagram now supports horizontally and vertically oriented images along with the square images they used to prefer. This increases your options but also makes image dimensions a little trickier to get right. Follow these guidelines to make sure your images end up looking their best.
INSTAGRAM PROFILE PHOTO SIZE
110 x 110 pixels
File Type: JPEG, PNG, BMP, and non-animated GIFs
INSTAGRAM FEED PHOTOS SIZE
Landscape: 1080 x 566 pixels
Portrait: 1080 x 1350 pixels
Square: 1080 x 1080 pixels
Supported aspect ratios: Anywhere between 1.91:1 and 4:5
Recommended image size: Width of 1080 pixels, height between 566 and 1350 pixels (depending on whether the image is landscape or portrait)
File Type: JPEG, PNG, BMP, and non-animated GIFs
INSTAGRAM STORIES ADS SIZES
1080 x 1920 pixels (recommended)
PINTEREST PROFILE PHOTO SIZE
165 x 165 pixels (recommended)
File type: PNG or JPEG
PINTEREST PIN IMAGE SIZE
I suggest you use between 600 and 735 pixels wide with a 2:3 aspect ratio (recommended)
File type: PNG or JPEG
Now that you know the current sizes that the social media websites require, how do you get your images from your Lightroom catalog to these online services?
EXPORTING YOUR PHOTOS TO SOCIAL MEDIA PLATFORMS - LIGHTROOM EXPORT PROCEDURES (MY FILE MANAGEMENT SOFTWARE)
EXPORTING YOUR PHOTOS TO SOCIAL MEDIA PLATFORMS - LIGHTROOM EXPORT PROCEDURES (MY FILE MANAGEMENT SOFTWARE)
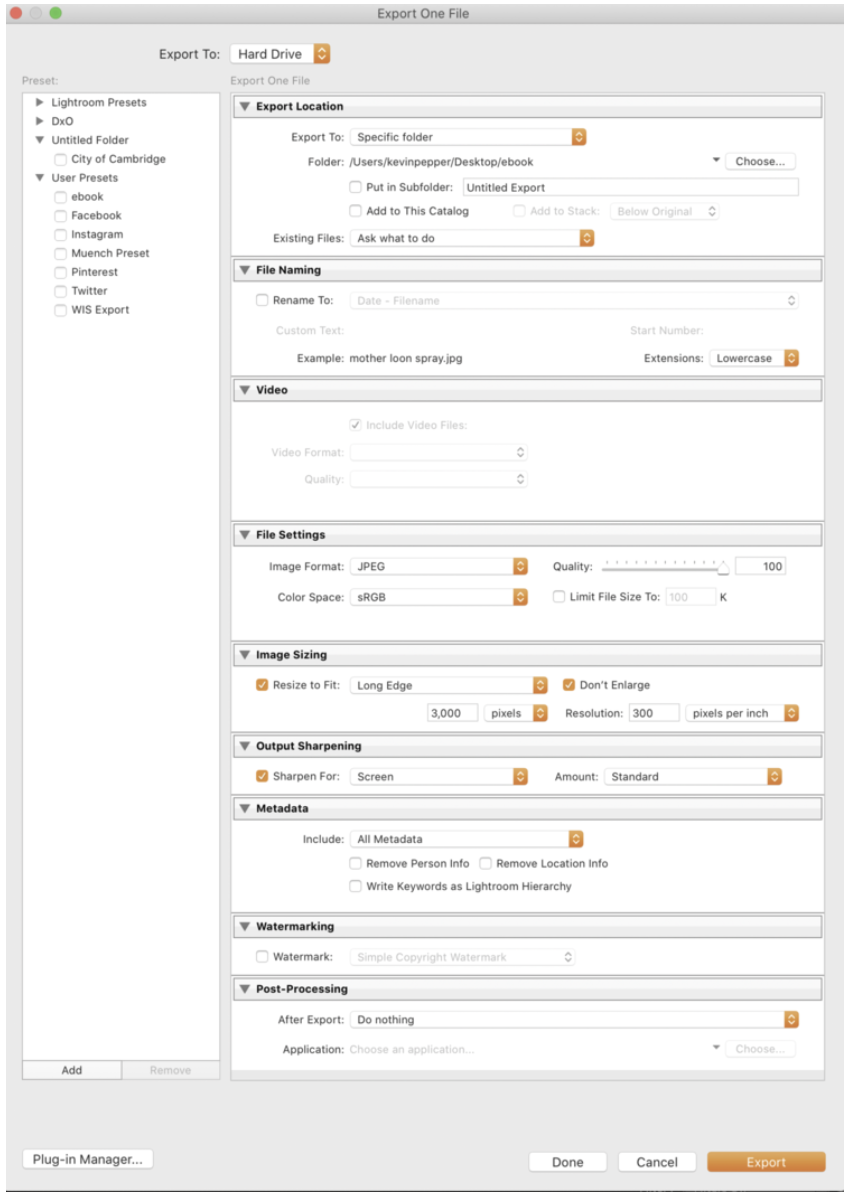
Step One: Once you select the image(s) that you want to export from Lightroom, click on the Export button. This will bring up the Export Dialogue Box where we are going to make some changes to the export settings that are ideal for sharing images on your social media platforms.
Step Two: Under “Export To” make sure you choose where you are going to save the files to, such as your Desktop. We prefer to set up a folder on our desktop with subfolders for each social media platform. As we have seen, different platforms have different size requirements. By exposing your image to the appropriate folder in the correct sizing there will be no confusion when uploading to the social media platform
Step Three: Under File Settings, you want the following:
Image Format: JPEG
Quality: 100
Color Space: sRGB
Limit File Size To: Make sure box is UNCHECKED
Step Four: This is where you will change the Image Sizing
Resize to Fit: Checked, and choose Long Edge
Don’t Enlarge: Make sure box is UNCHECKED
Pixels: Will be the pixel width of that we have previously mentioned the individual social platform handles.
Resolution: 72 and make sure it says Pixels Per Inch
Step Five: Apply Output Sharpening (Optional). We will often apply a little bit of output sharpening, but this is optional. If you wish to apply sharpening, just check the box “Sharpen For” and then choose “Screen”. If you are going to sharpen, choose Low or Standard for the setting if you do choose to apply.
Make sure you have saved these procedures as a preset. I label my presets, “Facebook’, “Twitter”, “Instagram” etc. Once the preset has been saved you will not have to go through this entire process again. It will be saved for the individual Social Media Channels.


